Showing posts with label Quilt Design Ideas. Show all posts

Monday, March 3, 2014

Paper Piecing Tutorial from a Amateur

I have decided that I am going to learn paper piecing. To make sure I know it well enough to do it I am going to teach it.  I will even show you what not to do.  To start off you need a block.  If your a beginner you want to start with something pretty easy.  I created a block Star Bright Block which is the motivation for the quilt I am making.  It is pretty easy and well is what I started with.

Step 1 Pick you pattern.  Using the attached PDF this block should finish as 6 1/2 inch I believe.


One thing I realized when doing my block is the order of the block.  I let EQ7 pick its own order, but I quickly learned that it would be easier to work from the center of the block out.  So I will be renumbering it with the first 2 in the middle then the next 2 moving out.  and the last 2 being the outside.

Step 2 Line up your first 2 fabrics.  You will want them nice sides together.  Then you will want to align them with the first line you plan to stitch. You can see the shadow of your fabric if you hold your paper up to the light.


Step 3  Sewing down the line.  You will want to start and end your line just before and after the line.  I did not back stitch at all and with going a little over each direction prevented the need for that.  I held my fabric together, but it would be acceptable to pin it in place.


Step 4 Trimming your block.  You will first want to fold your pattern down the line you sewed.  With the sewing line as your guide.  You will then want to trim your excess fabric and paper using your ruler.


Step 5 Iron your first 2 fabrics flat.


Step 6 For this block we need to add 5 more fabric pieces.  Starting at step 2 again repeat the process.  I learned on my first block that some fabrics are hard to see though and some practice is needed to get the next ones lined up.  Continue steps 2-6 for the next 4 pieces.


Step 7  Hopefully if you made it this far you have a block that looks somewhat like the block above.  Now that is not how we want the finished block so we now flip out papers over and trim.  Make sure you put your ruler on the 1/4 inch line so that there is the seam allowance left on the block to sew them all together when the blocks are all completed.


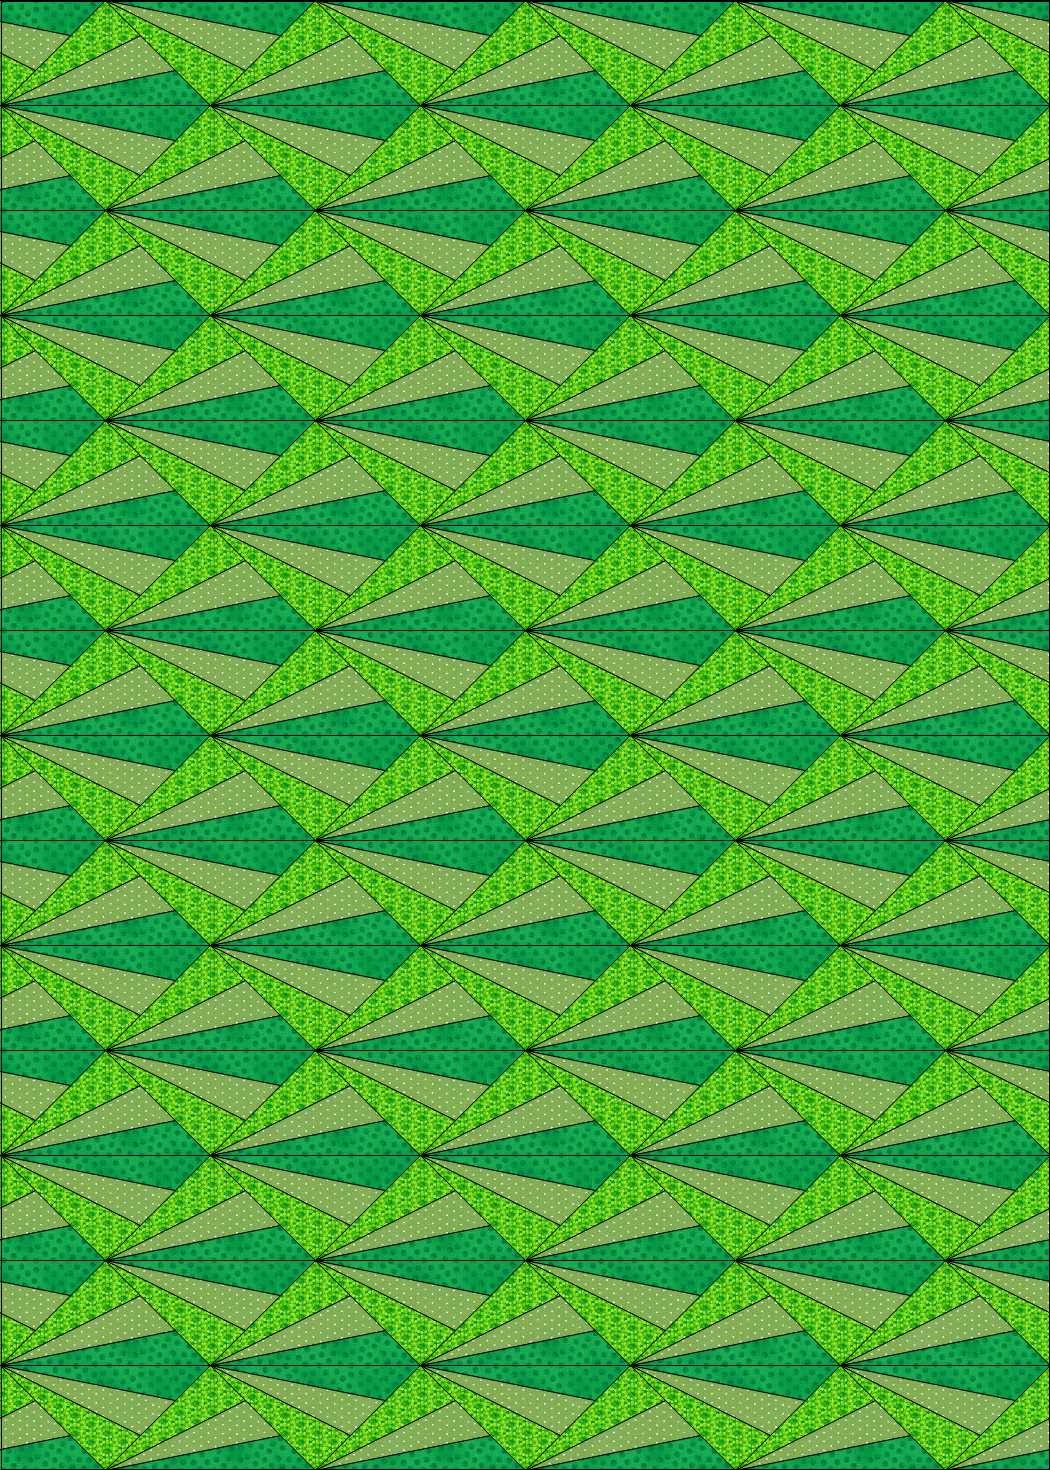
Step 8 Align your blocks for your finished quilt.  Here are a few suggestions.


OK, now for things not to do.  To start with make sure you know where your fabric is going.  When picking fabric pieces, make sure they are long and wide enough to fit the spot they need to cover.  My first try I started from the outside edge and worked in and learned the hard way that fabric needs to fit the block.  Not the block fit the fabric.  It is hard to see from the pictures, but my fabric did not cover the tip of my block. Good thing was this was the first block that I tried and I learned from my mistakes.  For the 2 middle pieces I started with 9 inch strip that was 2 1/4 wide. The next 2 strips, I used 8 and 7 inch strips both with 2 3/4 width.  It wasted more fabric, but caused much less frustration in the end.


As I hate wasting fabric, I ended up using my scraps to make a piece of fabric, that I will use on a hot pad some time later this year.  If you like or hate or think something is missing in my tutorial let me know.  Also if you have a favorite tutorial, please put it in the comments and I will check it out.  It is a new adventure for me to paper piece.


Check out this post to see what my plans for these blocks are.  I will post more of the blocks as I get them done.


Monday, February 24, 2014

I need to try something new, Star Bright!


I have been sitting here wondering what I want to do new next.  I use to try new things all of the time (new quilting things) and have not been doing them lately.  While reading blogs lately, I have been so amazed by all of the Paper Pieced things that people have been producing.  I have decided that I want to make something paper pieced.  So I sat down with EQ7 and designed out a simple 6 inch paper pieced block.  While drawing out different blocks (this was my 4th) my son Jared was helping me.  You can tell when he helps as everything has to be colored green (it is his favorite color).  He was had to point out my original blocks were not symmetrical and instructed me on how to properly make my block.


So having picked the block I decided I wanted to make a on point quilt (I seem to be on a diagonal kick for some reason). Any way tossing all of my blocks into a single quilt with approved quilt size from Tanya, I came up with what I will refer to as the frog quilt top.   This looks cute, but just wont cut it for me.


So twisting my blocks around, I was happy with what I then referred to as a star quilt.  I am fond of stars so it was good.  I do have issues though with the all green, but that can be fixed.  It was funny after I saved the above picture Jared had to point out that I messed up a block.  If you look at the bottom 2 blocks in the above shot they are facing the wrong direction.


Now this is what I finally decided was the quilt that I plan to make.  I plan to call it Star Bright.  Now I need to pick a fabric line and order fabric.  Then of course have to sit down and start making my paper pieced blocks.  I hope that after making that many simple paper pieced blocks, I can get good enough to do some of the cool complex blocks that so amaze me.

Monday, February 4, 2013

Over and Under A Quilt Design


Like every thing I design, I always start with yellow and orange.  You might just love this crazy color or do I just have issues.  Well that's simple I just have issues.  That and any time I can get my wife to look at something and just sigh at what I have come up with that helps too.

I sat down today while Julia was sleeping, she is still sick and I did not want to go too far away so I could grab her if she woke up so I opened up Electronic Quilt 7 the Quilt design software I bought for Tanya (she never uses it, but her birthday was closer when I had the money to buy it so she got it.  How many times have you gotten a wrench or a new saw just cause it was your B-day).  If you have never tried EQ7 you should, it is a lot of fun.  It has tons and tons of blocks and you can do many things with it.

I have been trying to make more modern designs and as a not so modern person I struggle at it.  My design process for this quilt was a little different than most.  I wanted to make a on point quilt.  So I went though all the blocks in EQ7 (yes it took a while as their are hundreds of them) and I finally settled on about 8 I wanted to play with.  One of them was the block here that on its own is not that impressing, but when I filled the full quilt up with them it gave me a million blocks.  So being modern, I just can't have a full quilt of the same block so I started removing squares one at a time from the designer (squares, not blocks)  this too some time to do.  I first went and colored all of the lines gray of the blocks I wanted to make go away.  In my finished quilt I wanted the blocks to be solid (not the gray on gray lines) so I went and started making blocks to replace the blocks that had pieces cut out.


So I ended up creating 5 new blocks out of my 1 original block and started replacing them in the design (Yes a lack of bars is not a block per say, its just a piece of fabric).  So I have the design done and I invited my son over to help me come up with a name.  His first though is I don't like the colors. (yes he is as bad as Tanya, no one understands my vision).


The left one was the last of James color choices its a purple and dark gray on a light gray back ground.  I added the border, could not decide if I liked it or not.  The first of his color choices was the brown and green on the blue background and the pink and light gray on the obsidian background was his 2nd.

Of course I show the design to Tanya and she hates mine (like she ever likes my choice) she thought the purple one was OK on James choices.  None of them was Tanya.

So yes the blocks should have given it away, we will end up with a brown and green quilt on a tan background.  The blocks by the way are 12 1/2 square and the borders are 3 inches.  It will end up to be a 91 x 108 inch quilt or so EQ7 tells me (well it says 90.853 x 107.823) but the rounding sounds better.


Related Posts Plugin for WordPress, Blogger...