
Making a rag quilt involves planning
just like any patchwork quilt. It can be simple and involve two
fabrics on the front, one fabric for back and a layer in between. If
you are using more than 3 fabrics, it is generally more time
consuming. Figure out the approximate size you would like your
finished quilt. I generally start with 6 inch squares for baby or lap
size quilts. This will make about a 5 inch square once sewn
together, but before washing. For a baby rag quilt I like to do 8
squares wide by 8 squares long. This will give a finished
size of 36-37 in both directions. This will vary slightly depending
on your seam allowance and fabric shrinking. Flannel will shrink more
than cotton. Planning for fabric varies some. I can get between 30
to 36 squares out of a yard of most fabric. I have lucked out a time
or two and got 42. I used about 1 2/3 yards of fabric for each of
front, center and back.
Choose your fabric. I like the
softness of flannel, but cotton is more durable. I have been told
homespun works great, but have not tried it yet. I personally didn't
like putting minky in a rag quilt, it stretches a lot different than
flannel or cotton. It is more difficult to use, but it also looks
great. Decide what you are going to do for the batting. I have used
a polyester (which I hated), cotton batting or cotton/polyester blend
or a third layer of flannel. I personally find a layer of flannel
the easiest to use. Some of it depends on what I have on hand.
Batting in the center is a great way to use of up smaller scraps from
other quilts or projects.
For this demonstration I am going to
use three layers of flannel, two different fabrics on top, and one
solid on the back. I will also show pictures of cotton batting being
used. I am going to make a baby quilt 8 squares by 8 squares. This
means I will need 64 squares for back, 32 of both fabrics for front
and 64 squares of flannel for center or 64 5 in squares of batting.

 Pre-cut all fabric and batting with rotary cutter. I guess you could use scissors, but a lot more time consuming. If you are using batting, plan for a ½ in seam allowance on each side. This means you would subtract one inch from each square. If you are using 6 inch blocks, your batting would be 5 inches, and an 8 inch block would be 7 in of batting.


Once your fabric is cut and stacked neatly in rows you will begin making your quilt sandwiches. When I first started, I pinned all them together like this. Over time I found that I could assemble as I go and just hold corners together. It is completely up to you. You will use a straight stitch on your sewing machine. A walking foot is useful, but not completely necessary. I don't use one. Sew from corner to corner diagonally. Sew many squares in one direction, and then cut apart squares and sew in the other direction to finish up x.


Once squares are assembled you will start sewing together squares into rows. If you have an extension table or your machine is even with your surface, it is easier to sew, but not necessary. Put two squares together with the back fabric touching. You will use a ½ inch seam allowance. If you do a little more you risk your batting showing on edge, a little less you won't have as fluffy of seams. The key is consistency. I have an issue with depth perception, and use a piece of tape on machine, to help line up. Continue sewing a square on the row until you reach your width. For my demonstration it is 8. Do this until all your rows are done.

 Once rows are done sewing, you will start to pin rows together in two's, lining up the seams. You will sew each row to the next. For me it is easier to sew four sets of two rows together, just make sure you don't mess up your pattern and then combine into sets of four. I don't have a real powerful machine and end up feeling like I am wrestling an alligator. Once your rows are combined, you will sew around the outside edge at about ½ inch mark. I use a straight stitch, others have used a zig zag. You will probably want to give your machine a through cleaning at this point, especially if you used flannel.
 Next comes the fun part, cutting up the seams. Warning, don't do this in clothes you are wearing out in public, unless you have a lint brush handy. You will get tons of threads/lint all over you. You want to cut close to seams without cutting them. I like to go between 2/3 and ¾ of the seam. You can fix cut seams, it just makes the process more difficult. Having proper scissors is really useful. I use Fiskars rag cutting scissors. They cost about 23 dollars at craft or fabric stores, a great item to use a 40% or 50% coupon on. The first rag quilt we made, we used regular scissors on, we cut many seams, over 6 on a twin and it took many hours to cut. The second one I bought a pair of scissors and they were spring loaded, but not strong enough to cut multiple layers of fabric. Then I decided to buy some heavy duty craft scissors, they work but you have to be careful and they take a lot more out of your hands. Anyway, I learned the hard way about having the proper tool. I cut all the seams in one direction and then start on the other direction. I save the outside edge for last. After it is cut you can shake it and then it is ready to wash. Many people take it to the laundromat, instead of the abuse your home washer and dryer will get. I have a front load washer, and make sure I clean out the seal after washing a rag quilt. I usually wash and dry on normal. After quilt is done washing, take it outside and shake off some of the lint, fabric, treads, etc., your dryer will thank you. Dry on low to medium heat and make sure to clean lint tray.


 |
| Good to use. |
 |
| Not strong enough to cut through multiple layers. |

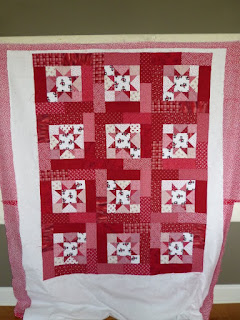
 Rag quilt are great for babies or kids
that will get all sorts of stuff spilled on them. Washing just makes
them more soft and cuddly.
Rag quilt are great for babies or kids
that will get all sorts of stuff spilled on them. Washing just makes
them more soft and cuddly.If you would like to enter a drawing to win a pair of Fiskars rag cutting scissors leave a comment below telling me what your favorite unusual color combination is. This drawing will end 11/26/12.


